Let’s kick off with a story to help understand Git Version Control:
Imagine a group of high school students working on a big history project. The project is to create a digital timeline of major historical events. Thus, each student is responsible for a different era, and they all contribute to a shared document.
On the first day, they all add their events to the document. It’s a great start. But the next day, one of the students, Alex, decides to change the format of the dates. Above all, he thinks it looks better, so he changes all the dates in the document.
When the other students open the document, they’re confused. The dates don’t make sense to them in this new format. They liked the old format better. However, Alex didn’t keep a copy of the old document, so they can’t return to the old dates. Consequently, they must spend a lot of time changing the dates to their original format.
Now, imagine if their document was under a Version Control System (VCS) like Git. When Alex decided to change the date format, he could have saved the current version of the document. Then, he could make his changes. If the other students didn’t like the changes, they could simply go back to the old version. Hence, there is no time wasted and no confusion.
That’s the beauty of a VCS. It allows you to save different versions of your project, and you can go back to any version at any time. As a result, it’s similar to a time machine for your project!
The Git version control system (VCS) allows people to work on projects simultaneously without overwriting each other’s changes. Therefore, it keeps track of all changes made to the project and lets you revert to any previous state of the project if needed.
Linux, as we know, when in the development phase in 2002, adopted a proprietary VCS BitKeeper. However, the Linux community and the company that made BitKeeper had a falling out. Because of this, they stopped letting people use BitKeeper for free. This led to the development of Git.
Therefore, the main goals of the Git version control system were:
Hence, in 2005, the first version of Git version control was released. It’s amazingly fast and suitable for large projects. Git has an incredible branching system for non-linear development.
There are numerous VCS in the wild; SVN, Perforce, and Bazaar are a few names. Nevertheless, when should we select the Git version control system?
Git is ideal when you have many contributors working in parallel.
It handles potential conflicts efficiently, allowing developers to work independently on different features or implement bug fixes.
Git’s distributed nature allows developers to work locally offline. They can commit changes, create branches, and manage their work without an internet connection.
Git is often the go-to choice for open-source projects. Additionally, its ability to support parallel work makes it suitable for situations where contributors often work without external coordination.
Git and GitHub are not the same thing, but many people mix them up. Let me explain the difference.
Git is a version control system that helps programmers manage and track changes to their code. Hence, it’s like a time machine, allowing you to revert to any version of your code. It is but a tool for you.
GitHub, on the other hand, is an online platform that uses Git. As a result, it allows programmers to store their code online, share it, and collaborate with others. Therefore, while Git helps you manage your code, GitHub helps you share and collaborate on it.
Now let’s discuss the popular features that Git provides:

It refers to its ability to allow multiple developers to work on the same project from different locations, each with a full copy of the project’s history. Hence, if there’s a system failure at the central server, the entire codebase and history can be restored from any of the developer’s local repositories.

It refers to its ability to work across various operating systems (OS) and its interoperability with other Version Control Systems (VCS) like SVN, CVK, and so on. Also, the compatibility feature enhances its versatility, making Git a flexible tool for developers working in different environments or those transitioning from other version control systems.
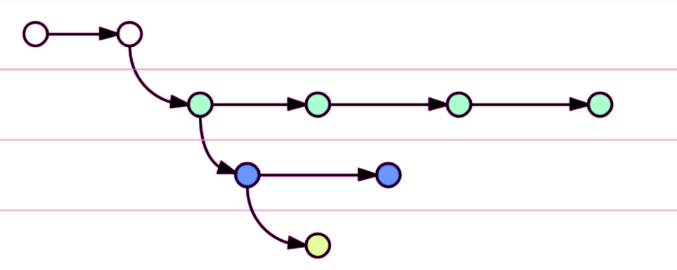
Git enhances collaboration and efficiency by allowing multiple lines of independent development. Therefore, it relies on branching within the code base to support different versions.
Git is a tool that many developers use. It uses lossless compression that makes files smaller without losing any information. Furthermore, it implies that Git doesn’t take up much space on your computer when you’re saving new files or changes.

Git is managed locally, and data is compressed. As a result, Git is much faster and offers higher performance than other VCS tools available on the market.

The source code of Git is readily available and can be modified to serve any special requirement that a project requires. Additionally, a large and robust community is present to maintain and support Git.

Git is a version control system that is distributed, meaning that in the event of a system crash, a copy of the code is present in every contributing member’s local system. This copy can be used to restore lost data.
Moreover, Git uses a unique identifier called a SHA (Simple Hashing Algorithm) to name and identify the objects. All changes and commits are verified by checking its SHA checksum at the time of checkout.
When we start learning something new, it’s important to grasp the fundamental elements and terms of that system. In this case, we’ll look at some key parts of the Git version control system that we’ll use throughout this section.
A collection of files and their history is stored in a Git database. Repositories can be hosted on a central server (e.g., GitHub or GitLab) or stored locally on a developer’s machine.
A snapshot or a version of the changes made to a repository at a specific point in time.
The term is used to refer to the repository hosted on the Server. Therefore, a developer’s or company’s local Git repository hosted in GitHub or any other Git host platform for sharing and collaboration is generally called a Remote repository.
Represents a line of development in the repository. A repository can have multiple branches. For example, a new feature that is under development may have a difference in a file.
A command that is used to switch between branches.
A reference to the last commit in the currently checked-out branch.
A copy of a repository that allows you to experiment with changes freely without affecting the original project.
Proposed changes to a repository submitted by a user and accepted or rejected by a repository’s collaborators.
A Git command that allows you to take the contents of a source branch and integrate it with a target branch.
A copy of a repository that lives on your computer instead of on a website’s server somewhere, or the act of making that copy.
Note: It’s important to understand and familiarize yourself with these terminologies, as this will often be used for the rest of the sections.
Git version control system is supported by all popular OS like Windows, Linux, and Mac,
All can be found in Git – Downloads (git-scm.com)
Therefore, as we complete the introduction and setup of the system, let’s not waste time and dive into Git.
Note: – For the following part, it is assumed that the reader possesses basic knowledge of Linux or Mac terminal or Windows PowerShell as it will be used in the explanation.
Here are the Git commands in which we will deal with a repository with
The command creates an empty Git repository in the current directory. Once you have created a new repository, you can start adding files to it.
It creates a .git subdirectory in the current working directory and initializes a HEAD pointer, objects, refs, and temp files.
$ git init
It is a command that helps download existing source code from a remote repository.
Git clone makes a similar copy of the latest version of a project in a repository. Then, it helps save the copy to your computer.
$ git clone <https://name-of-the-repository-link>
A branch is like a copy of the original code that you can work on without changing the original. You can create a new branch whenever you want, and you can switch between branches whenever you want.
This way, you can work on different parts of the project without interfering with each other.
To create a new branch, you can use the command:
$ git branch <branch-name>
This will create a new branch with the name you specify. Once you’ve created a new branch, you can switch to it using the command
$ git checkout <branch-name>
Alternatively, you can create and switch to a branch by specifying
$ git checkout –b <branch-name>
For listing all branches in the git repository, you can use:
$ git branch or git branch –list
For deleting a branch, you can use:
$ git branch -d <branch-name>
To work in a branch, at the outset, you need to switch to it. You can use git checkout mostly for switching from one branch to another. Alternatively, you can use it to check out files and commits.
$ git checkout <name-of-your-branch>
It’s the command that shows you the current state of your Git repository. It tells you which files have been modified, which files are staged for the next commit, and which files are not being tracked by Git.
$ git status
Here are some of the options you can use with git status:
-s or –short: This option gives you a more concise output.
-b or –branch: This option shows you the current branch and tracking information.
-v or –verbose: This option shows you the changes that are staged to be committed and the changes that are not yet staged.
–show-stash: This option shows you the number of entries currently stashed away.
In Git version control, a stash is a way to save changes that you have made to your code without committing them. This is useful when you want to switch to a different branch or work on a different feature but you don’t want to commit your changes yet.
$ git stash
Or
$ git stash save “stash name”
You can also use the git stash list command to see a list of all the stashes you have created and the git stash drop command to delete a stash.
Git will save your changes and revert your working directory to the last commit. You can then switch to a different branch or work on a different feature. Once, when you’re ready to go back to the changes you stashed, you can use the git stash apply command to apply the changes to your working directory.
If you have multiple stashes, then we can specify the stash ID and apply a specific stash. The stash ID can be found by executing the git stash list.
$ git stash apply stash@{2}
In the above example, “stash@{2}” is the stash ID of the stash that is being applied.
git stash apply will keep the stash even after the change has been made; for removing the stash after the changes have been made, we can use the:
$ git stash pop
Note: – we can only use git stash pop to apply and delete the changes at the top of the stash. Git stores the stashes in a last-in-first-out (LIFO) approach.
git add is a command that lets you add changes you’ve made to your code to the next commit. When you make changes to your code, Git doesn’t automatically track them. You must tell Git which changes you want to include in the next commit.
To do this, you use:
$ git add
You can use it to add specific files or directories, or you can use it to add all the changes you’ve made. For example, if you want to add all the changes you’ve made, you can use:
$ git add.
The “.” tells Git to include all changes to the current directory.
To add a single file, we can use: $ git add <file>
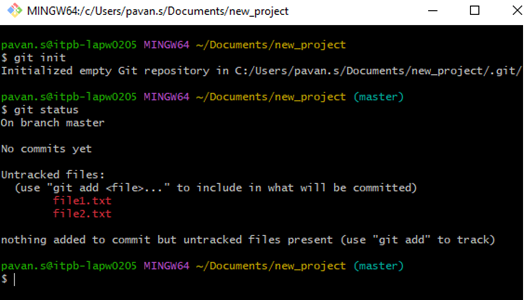
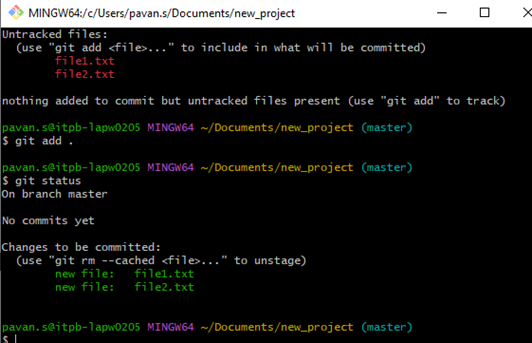
In the screenshot below, the Git status command is executed, and any new files added will be untracked (the one in red font color) as mentioned above. Once after executing git add, the file will be highlighted in green (shown in the second screenshot).
This command saves the changes you’ve made to your code to your local repository. When you make changes to your code, the Git version control system doesn’t automatically save them. You must tell Git which changes you want to include in the next commit.
It’s like creating a new version of the code base with those changes that you have staged (i.e., the green highlighted files after you do git add)
You can commit changes by using:
$ git commit -m “commit message”
If you have a longer message, just leave the –m “commit message” part, and the default text editor will open up and ask for the commit message.
Once you’ve entered your commit message and saved the file, Git will create a new commit with the changes you’ve staged and the commit message you entered. You can use the git log command to view a list of all the commits in your repository.
Note: – Git commits to save the new commit locally. It will not be pushed to the remote repository. For publishing the changes, we should use “git push”
It is the command that lets you upload your local repository changes to a remote repository.
i.e., Git push moves your commits to the remote repository.
$ git push <remote> <branch-name>
Suppose your branch is newly created, you also need to upload the branch with the following command:
$ git push -u <remote> <name-of-your-branch>
When you’re working on a project with other people, they might make changes to the code that you don’t have yet. Also, you can use git pull to download those changes and merge them with your own code
git pull is a command that lets you download changes from a remote repository and integrate them into your local repository.
$ git pull
Or
$ git pull <remote>
This command combines git fetch and git merge. Hence, it implies that when we use git pull, it gets the updates from the remote repository (git fetch). It immediately applies the recent changes in your local (git merge).
This may cause conflicts, and you need to resolve them manually.
When you’re working on a project with other people, you might make changes to the code that you don’t have yet. You can also use git merge to combine those changes with your own code.
git merge is a command that lets you combine changes from one branch into another.
Accordingly, two branches can be merged by using the command:
$ git merge <branch-to-merge>
Note: – Make sure the following before merging two branches.
With these commands, I am confident enough that you can do most of the collaborative work with other contributors in a project. There are also many more aspects to learn about Git; I will discuss them in detail in separate articles.
Git version control is a complex and versatile tool that can help you manage your projects and collaborate with others. However, there is much more to learn and explore than what we have covered in this article. Therefore, I encourage you to practice what you have learned, read the official documentation, and seek help from the online community if you encounter any problems.
In this article, we have learned the basics of the Git version control system, a powerful and popular version control system. We have seen how to create a repository, add files, commit changes, push and pull from a remote server, and merge branches. Also, we have learned some useful commands and tips to work with Git more efficiently and avoid common errors.
If you want further assistance, make use of expert help from ThinkPalm’s software development services in the UK, get in touch with us! Additionally, we will provide you with all support to fulfill your project’s requirements.
I hope that this article has given you a solid foundation and a gentle introduction to Git. I also hope that you have enjoyed reading it and found it useful. Thank you for your time and attention. Happy coding!

Pavan Sunny Thomas is a Java Full Stack Developer with expertise in developing and maintaining Java-based web applications using Spring Boot, Hibernate, Angular, and other technologies. He is passionate about web development and enjoys learning new skills and tools. Also, an avid blogger, Pavan shares his insights and tips on web development and showcases his portfolio of projects.