How to Implement Self-Healing Test Automation: A Step-by-Step Guide
Testing as a Service (TaaS)
 Chandni Nadarajan
September 3, 2026
Chandni Nadarajan
September 3, 2026



 Chandni Nadarajan
September 3, 2026
Chandni Nadarajan
September 3, 2026
Consider the scenario. The QA team decided to implement self-healing test automation. With high hopes, the feature was placed across hundreds of automated tests. And everyone expected maintenance work to drop significantly. Unfortunately, it did not deliver the desired results.
Some tests began interacting with the wrong UI elements. Others never healed at all because the confidence thresholds were too restrictive. Instead of saving time, the team found themselves spending more hours chasing unexpected behavior than they ever spent on the original test failures. Three months later, self-healing was turned off, not because the technology had failed, but because they’d skipped the groundwork it needed to work.
Self-healing test automation is not a feature you can simply switch on. Once you decide to implement self-healing test automation, it requires adequate planning, calibration, governance, and continuous measurement.
New to self-healing test automation? We recommend starting with ‘What Is Self-Healing Test Automation?’ to get a clear understanding of the fundamentals. Once you’re familiar with the concept, this guide will walk you through the implementation process step by step.
Most teams fail to implement self-healing test automation in the right way, treating it as a plug and play feature rather than a phased approach. Here’s the mistake we see most often: teams often skip the QA automation roadmap without calibration or baseline metrics, which makes ROI tracking and execution control difficult.
The other common mistake is scope. Attempting a self-healing automation setup across the entire suite instead of a pilot set would tend to backfire, and the platform may even get turned off within a quarter.
Self-healing test automation will deliver its best results only if it follows the implementation phases in sequence: audit, instrument, configure, pilot, calibrate, review, measure, expand. Each step lowers the risk of the next one. Bypassing any of these steps would result in inaccurate heals where the engine silently interacts with the wrong element or makes the platform idle, where strict settings keep the engine from running at all. Either way, the outcome looks the same i.e. the feature gets disabled within a quarter, and the budget conversation gets harder next time.
Before your team touches a self-healing platform, make sure these are in place:
Definition
A pre-implementation baseline is the only way to prove ROI to stakeholders after rollout. Start by tracking your flaky test rate and the number of maintenance hours you spend each week. Then, after 60 days, take another look at those numbers. If you don’t have this data, saying “maintenance feels easier now” is just a subjective feeling, not a concrete result.
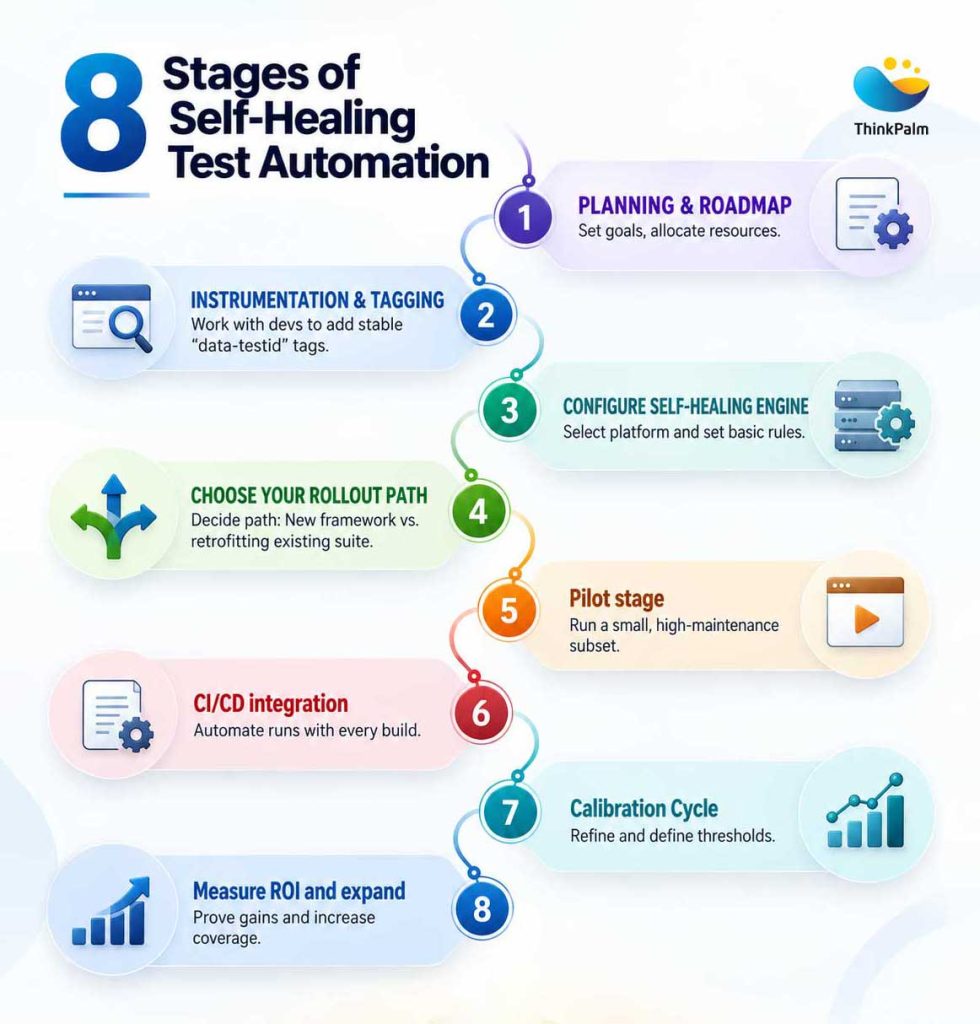
Stages of self-healing test automation
Before launching your self-healing automation set up, focus on areas where your team finds it most challenging. Then you may begin evaluating performance over the last 90 days.
Your ideal starting point should aim at tests with the highest maintenance burden and frequent locator failures. Once you tackle this combination and prove its ROI early, it gives you the trigger to expand your QA automation roadmap further.
This is a critical step and is believed to deliver the highest leverage in any self-healing automation setup. The accuracy of a self-healing engine depends entirely on the strength of its fallback signals.
Those teams that put in this groundwork do not require the healing engine to step in because the standard engine does its work automatically. Teams that skip it end up relying on the AI or visual fallback, which is slower and less effective.
You need to look for these dimensions before you commit:
Don’t rely on one identifier; use multiple backup methods to find elements on a page, not just one brittle method.
Keep varying confidence thresholds instead of forcing the same level of caution everywhere.
Can handle tricky visual elements (like canvas/WebGL or embedded third-party widgets) using image recognition, not just code-based locators.
Human-in-the-loop review mode before script updates go live.
Keeps a clear record of every change it makes (what it changed and why), so you can audit it later.
Plugs into your existing build pipeline without extra hassle (GitHub Actions, Jenkins, GitLab CI, Azure DevOps, CircleCI).
Compatibility with your current framework so you’re not rebuilding tests to adopt it.
Start with strict confidence thresholds. Only relax them once the healing log shows the engine is working well with your application.
Platforms like TestNova can generate and heal scripts for Playwright, Selenium, Cypress, Pytest, Jest, and Puppeteer, using Python, JavaScript, TypeScript, and Java. This means you don’t have to switch frameworks, which makes Step 4 possible without rewriting your tests.
The way you implement your self-healing automation set up depends on where you’re starting from. If you are building from scratch or updating an existing framework, choose the path that fits your situation:
Either way, the underlying rule is the same: avoid turning on self-healing everywhere at once. Staged rollouts protect production pipelines and ensure you capture lasting time savings.
Don’t migrate everything at once. Start with a measured approach where you begin with the most demanding test set typically around 50 to 100 tests and only expand once you’ve confirmed the results are solid.
This is where CI/CD test automation either pays off or becomes another dashboard nobody checks. Make sure your pipeline is designed to trigger self-healing runs with every build, not just on a nightly schedule.
Once healing is stable in your pipeline, combine it with test impact analysis. This way, you’re not just speeding up the healing of broken locators, you’re also running fewer irrelevant tests with each build.
Execute your pilot suite for two to four sprints without altering the confidence threshold. Use this phase strictly to observe engine accuracy, not to optimize settings.
To fine-tune your self-healing automation setup, focus on these key review tasks:
Set up a weekly routine to check your healing logs and evaluate your progress against your starting baseline after 60 days.
Review workflow:
[The targets below are illustrative starting points, not universal benchmarks. Actual results vary based on application complexity, test-suite quality, locator stability, implementation maturity, and the capabilities of the self-healing platform.]
| Metric | Target |
|---|---|
| Healing rate (locator failures auto-healed) | Over 80% |
| Heal accuracy (heals targeting the correct element) | Over 95% |
| Maintenance hours per sprint | Significant decline from baseline |
| Flaky test rate | Under 5% |
| CI/CD pipeline success rate | Over 95% |
| Healing frequency per test | Alert if any single test heals more than 3x/week |
| Phase | Timeline | Key Milestones & Expected Impact |
|---|---|---|
| Calibration | Weeks 1–2 | Baseline healing logs established; confidence thresholds fine-tuned to your application. |
| Pilot | Weeks 3–6 | 20–40% maintenance reduction for pilot tests; team comfortable with the review workflow. |
| Full Rollout | Months 2–3 | 40–70% overall maintenance reduction; measurable stability gains across CI/CD pipelines. |
| Optimization | Months 4+ | AI model fully tuned to your codebase; predictive maintenance active; full ROI realized. |
Smaller teams with simpler suites can move through this in 4–6 weeks. Whereas enterprise organizations running 10,000+ tests should plan for 3–6 months to account for rollout and change management across teams.
Use this when comparing self-healing platforms:
Treating healing as a substitute for good test design: Self-healing improves test maintenance; it doesn’t fix poorly written tests.
Setting confidence thresholds too low from the start: Being too aggressive increases the risk of incorrect heals.
Ignoring the healing log: Monitoring healing events is essential for trust and continuous improvement.
No semantic attributes in the application: The AI needs stable identifiers to make reliable decisions.
Rolling out to the entire suite immediately: Start small, validate results, then scale gradually.
Expecting high ROI from a small test suite: Self-healing delivers the greatest value in large, frequently changing test environments.
Using self-healing for API, unit, or load tests: Self-healing is designed for UI automation, where element locators can change.
A rollout plan gets you a working self-healing pipeline, it doesn’t turn self-healing into something it isn’t. As we covered in our guide to self-healing benefits, challenges, and best practices, the technology solves element identification failures. It does not fix genuine application bugs, flawed assertion logic, poor test architecture, or a complete UI redesign that needs tests rewritten from scratch. Building your rollout around that boundary rather than discovering it in production is what keeps a self-healing program credible with engineering leadership past the pilot phase.
At ThinkPalm, we help teams approach AI test automation implementation as a structured rollout rather than a simple tool deployment introducing self-healing capabilities without disrupting the testing frameworks and workflows they already use.
With TestNova and our Testing as a Service approach, we help integrate self-healing into existing Selenium and Playwright-based automation and CI/CD workflows, strengthen test resilience with multi-attribute locators, and improve maintainability through reusable components and robust test architecture. This allows teams to introduce self-healing gradually while building a more resilient and maintainable self-healing automation setup.
Implementation is a sequence, not a switch – plan for 8-12 weeks minimum
Instrument your application with semantic attributes before you configure thresholds
Choose your rollout path (new framework vs. existing suite) before you pick a pilot set
Start with your highest-maintenance tests and expand only after validating results
Calibration isn’t optional, run at least two sprints before you touch thresholds
Measure everything against a pre-implementation baseline, or you can’t prove ROI
The healing log is both a compliance asset and your best diagnostic tool
Implementing self-healing test automation well has less to do with the platform you choose and more to do with the order you do things in. Audit before you automate. Instrument before you configure. Pilot before you scale. Calibrate before you optimize. Teams that follow that sequence as part of a deliberate QA automation roadmap see the maintenance reduction this technology promises. Teams that skip straight to “turn it on everywhere” usually end up disabling it within a quarter, for reasons that had nothing to do with the tool itself.
Ready to Roll Out Self-Healing Without the Guesswork?
ThinkPalm’s Testing as a Service experts build your rollout plan, instrument your application, and get your pilot set live with a baseline you can actually report back on.
Chandni Nadarajan is a content writer at ThinkPalm Technologies, specializing in B2B marketing content. With a passion for turning complex ideas into clear, engaging narratives, she blends strong research and storytelling skills to make technical topics accessible. Her expertise spans technology, automation, and digital business solutions.